My Favorite Things Release

MFTandFriends

Hi all! It’s been a while! I haven’t been as present on my blog lately, but if you ever miss seeing my projects be sure to check me out on Instagram! Today I’m popping in to share a card from the fun new My Favorite Things release. The release is full of cute products, and today’s card showcases just a couple of them.

IMG_4698

I just love this cute kitten basking in the sun! The fun rectangle stencil is such a unique and fun addition to any card, I couldn’t wait to use it as my background here. I kept it simple and stamped the sentiment below my little scene, and the card was complete!  Be sure to check out MFT for all of the new release goodies and get all the inspiration from the rest of the projects!

Thanks so much for stopping by today. I hope you enjoyed the card! Have a great day!

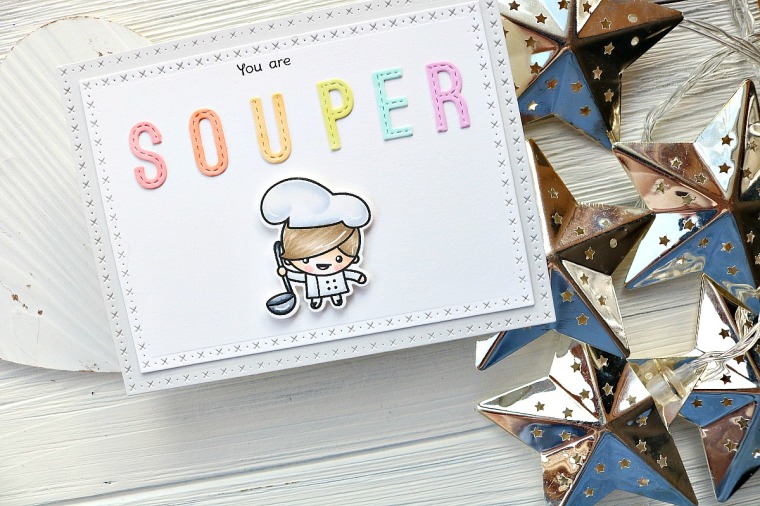
You Are Souper

Hi, everyone! Happy Monday. This week is going to be a busy week for me, so I decided to make an encouragement card for today’s Penguin Palace post. Anyone else needing a little encouragement to get through Monday? Let’s jump in!

IMG_3358

I started the card for today by die cutting two of the Cross Stitched and Dots Large and Small die sets. The larger one I die cut from some light gray card stock and the smaller from some white card stock. I love the detail that these dies add to a card. It’s so sweet.

IMG_3360

Next I did some creative masking to stamp out the “you are” sentiment from the Get Well Soon stamp set. I love searching other stamp sets to create my own sentiments. To finish the sentiment I die cut some of the Heffy Doodle alphabet dies to spell out “souper” from white card stock. I colored the letters in with my Copic markers for a fun pop of color.

IMG_3361

Finally, I stamped out the chef from the It’s Your Day and colored him in with my Copics. I used the coordinating dies to cut him out and popped him onto the card with foam tape. And that finished my card for today! I hope you enjoyed this creation, and that it brightened up your Monday a little 🙂 Thanks so much for stopping by today. I’ll see you again soon with another card!

My Favorite Things Sketch Challenge

Good morning, everyone! Happy Wednesday. I’m back today to share my final My Favorite Things project as a guest designer for their challenge blog! I’m so sad the month is over, but it’s been so much fun getting creative with their sketches.

thumbnail (2)

This sketch was a fun one to end on, and I had the perfect idea for it. I was inspired by the freebie that comes with orders of $60 or more from MFT and the adorable new stamp set Purrfect Friends.

IMG_3323

I die cut the tree branch from white card stock and ink blended Stained Walnut Distress Oxide ink on it. I also splattered some of the Stained Walnut ink watered down over it. I also ink blended Broken China Distress Oxide Ink over an A2 size card panel. I splattered some watered down Faded Jeans Distress Oxide over the entire panel. I attached the branch to the card panel using some foam tape once they were both dry.

IMG_3325

Next I stamped out three of the birds from the Purrfect Friends and colored them in with my Copic markers. I used the coordinating dies to cut them out and attached them to the branch with foam tape and some glue. I could resist stamping one of the cats so that it looked as though he was watching the birds from the ground.

IMG_3326

Finally, I stamped out one of the sentiments from the new Anything But Basic Encouragement stamp set with VersaMark ink and heat embossed white embossing powder. Then I ink blended some pink ink over it and trimmed it down. It was also attached to the card with some foam tape. And that was it for my card! I hope you like the projects I’ve made for my month as a special guest designer for MFT stamps! I’ve had fun sharing them with you 🙂 Be sure to head over to their challenge blog and see more great inspiration! Thanks for stopping by and I’ll see you again with another card!

Happy Birthday!

Hello, everyone! Happy Monday. I’m back today to share a cute and simple birthday card I made by mixing some new and old Penguin Palace products. Let’s jump right in.

IMG_3328

I started by doing some ink blending with a stencil I made using the new It’s Your Day Bubble Call-Out die. Using the negative of the die cut I ink blended some Distress Oxide onto an A2 size card panel. I positioned it so that it hung over the top edge of the panel, and splatterd some water droplets over it for a textured look.

IMG_3329

Next I die cut one of the borders from the Fancy Hearts Scalloped Boarders die set to use as a frame on the card. I colored the frame with one of my Copic markers. That piece was adhered to the card panel with a liquid adhesive.

IMG_3330

Finally, I stamped and colored one of the adorable unicorns from Birthday Unicorn stamp set. Once it was colored I die cut it out with the coordinating dies and adhered it with some foam tape below the speech bubble. After adding some white gel pen details to the card it was complete! I hope you enjoyed this card I made for today. Be sure to check out all the newly released products from Penguin Palace! Thank you for stopping by today, and I’ll see you again soon with another card!

Your Next Stamp March Release Blog Hop!

March2019HopBadgeSquare

Welcome back, friends! I’m super excited to have you here. We’re celebrating the Your Next Stamp March release with a blog hop. The team has created a lot of fun projects, there are prizes and a great coupon code for you to use on your order! Let’s take a look at my card!

IMG_3143

I think this Cook Up Some Fun stamp set is so cute! I love this chef, and the food and there are so many food and drinks that you can put on his tray! I went with an ice cream sundae, but there are so many options. I made this card really simple, highlighting the ice cream with the Starburst die, and creating the a ground simply by masking off the bottom of the card and splattering it with some paint. I think you could do so many cute scenes with this set!

March2019SaleBadge

If you’re interested in getting some of the new goodies, make sure you use the coupon code for your order! And if you want to enter yourself for a chance to win a $25 gift certificate to the YNS shop, be sure to comment on all of the posts along the hop! You can get to the rest of the posts by clicking the blue button below:

That’s it for me today! Be sure to check out the rest of the new products! There are so many cute stamps dies and gumdrops! Thanks so much for stopping by today, and I’ll see you again soon with another card!

Pastel Inspiration

Hi, everyone! I hope you’re all having a great start to your week. I’m popping in quick today to share a card I made for Craftin’ Desert Divas. Todays card was inspired by the creative challenge on the CDD blog. The theme is pastel colors! I love pastels, so this was super easy to go with. Here’s the card I came up with.

IMG_2867.jpg

I had this lamb from Wooly Lambs already colored up, so I decided to go with a simple card for the design. I embossed the Burst Stencil to give a focal point on the card, and ink blended Shaded Lilac and Spun Sugar Distress Oxide ink over the center of it. Then I heat embossed a sentiment, and added the lamb with some foam adhesive. To finish off the card I added some white gel pen accents, and the card was complete! I hope you enjoyed this card for today. Thanks so much for joining me, and I’ll see you again soon with another card!!

Sending Hedge Hugs

Hi there, everyone! Welcome back to my blog. Today I’m back to share a card I made for Penguin Palace that is quick and simple! Sometimes you’re just in a hurry and I have some go-to techniques that look great, but are really quick.

img_2696

To start out, I ink blended a background with Dried Marigold and Worn Lipstick Distress Oxide ink. These blend so beautiful. It’s still a work out on your arm, but it goes pretty quick! And you can customize what colors you’ll end up with because of the large variety of Distress Oxide colors. I splattered some white paint on the background to give it a little interest, but that too was simple!

img_2700

Next I took the Hedgehogs In Love stamp set from Penguin Palace and stamped out the two cute hedgehogs you see. I picked them because I thought they looked like a cute little couple. I stamped them with my Copic friendly ink, and colored them in with some very simple Copic color combos. There isn’t much to these little critters, so coloring took no time at all! I made sure to try to match their accessories to the background to make it look more planned out and cohesive. They were die cut and set aside to be attached later.

img_2701

For the panel they’re sitting on, I trimmed down a piece of white 110 lb cardstock and used a stitched die on the top and bottom to add some nice detail. The addition of this took only minutes, but added such a fun element to the card! Then I stamped the sentiment on the lower left side and adhered the hedgehogs.

img_2698

The strip was attached to my background, which was attached to a card panel and this card was done! Like I said, quick and simple! I hope you enjoyed the card for today. If you think these hedgehogs are as cute as I do, be sure to check them out in the Penguin Palace shop! Thanks so much for stopping by today. Have a great day, and I’ll see you again soon with another card!

Oh My Gourd

Today I’m sharing a card that that is super easy to create, and uses the adorable Veggie Patch stamp set!

IMG_2284

Hi, crafty friends! I hope you all had a wonderful week so far. It’s Cassie here, and I’m back to share a fun and easy card with you all! I’m coming off of my holiday crafting and needed a little break from it, so I whipped up this cute veggie thank you. It was so fun to color these sweet vegetables!

IMG_2286s

I started today’s card by die cutting the largest of the stitched rectangle dies from the Imperial Stitched Rectangle die set out of some 110 lb, white card stock. I used a Copic friendly card stock and ink. I stamped the veggies from the Veggie Patch stamp set to the left of the card panel, leaving a portion of the panel open for a sentiment. Once They were all stamped, I colored them in with Copic markers and added some white gel pen accents to give them a little more detail.

IMG_2287

Next, I stamped the two hearts from the set with some tan dye ink all over the background. I liked the way this looked, but wanted to fill it in a little more, so I took a Copic marker in a similar color and added dots all over the background as well. An important tip about stamping out a background like this is to make sure some of the hearts look like they’re going behind the vegetables. That way it looks like a continuous pattern! I did this the lazy way, by using a post it note to mask the images as I stamped over them so the ink didn’t go over the portion I had colored in with Copics.

IMG_2285

To finish off the card, I stamped out the sentiment “Oh my gourd” on a piece of the 110 lb white card stock with VersaMark ink. I heat embossed white embossing powder over it, and then I ink blended some Walnut Stain Distress Oxide ink over it. I did the same with the cute little word bubble from Whatcha Sayin’ Now and die cut them both out. For the sentiment strip I used the Strips of Ease die so that the sentiment was cut perfectly.


Eat, Drink and Be Merry

Hello, everyone! I hope you’re all enjoying your day, and for those who are celebrating Christmas that you’re having a lovely Christmas Eve! I’m popping in quickly today to share a card that is quick and simple. It’s perfect for that last minute card you need, and I whipped it together in no time.

IMG_2536

I started by die cutting a stitched rectangle the size of an A2 size card from a piece of Penguin Palace’s Red Carpet card stock. This is a textured, heavy weight card stock that is the perfect red for Christmas cards-and I can’t wait to use it for Valentine’s day! Next I die cut some letters from the center in an arch. I die cut the word ‘merry’ and adhered the red piece of card stock to a card base. I made sure to save the inside pieces of the R’s to adhere as well.

IMG_2532

Next I took the stamp from the Spooky Halloween set that said “eat drink and be spooky” and did some masking so that spooky was cut off and instead it read “merry.” I love being able to use my stamps in a lot of different ways, and this was the perfect mash up!

IMG_2534

To finish it off I stamped and colored one of the sheep from Cuddly Sheep’s Season’s Greetings and fussy cut him out. I popped him onto the card with some foam tape and the card was complete! That’s it for my quick and simple card today! I hope you enjoyed it. Thanks so much for stopping by 🙂 I hope you’re all have a wonderful holiday season!

Your Next Stamp November Preview

Hi, all! I hope you’re doing well 🙂 I’m back today to share a card I made for the Your Next Stamp November Preview. The products from this release are sooooo cute! Tons of sweet holiday sets and dies. Let’s jump right in!

IMG_24052

This super cute wreath set is being released this month. I love these adorable images that have been featured in previous sets as well. I went with a simple card for this project, and made it so you could see through to the inside of the card through the wreath’s middle.

IMG_2408

I just love those sweet birds. The set comes with a great banner and some sentiments perfect for the holidays!

IMG_24051

Be sure to head over to the Your Next Stamp blog and see all of the previews from the rest of the team!! There are a lot of great projects to be seen 🙂 Thanks so much for stopping by and I’ll see you again soon with another card!