My Favorite Things Sketch!

Hi, everyone! I’m back with another My Favorite Things sketch challenge card to share with you. Today’s sketch is one that you could do a lot with. I had fun stacking animals on top of each other for it! Here’s a look at the sketch challenge:

thumbnail.jpg

And here’s what I came up with!

IMG_3226

I just had to use some of the products from the new March release for this card! They’re so dang cute. I started the card by using the cloud die from the Interactive Swing die set to ink blend some clouds in the background. I used Milled Lavender for this and splattered some white paint and Milled Lavender watered down over the panel. Once that was dried I heat embossed a sentiment from the Anything But Basic stamp set across the middle of the card. I love the sentiments in this set! They are so fun and sassy.

IMG_3233

Next I stamped out some of the images from the new Cute Critters stamp set. I colored them in with my Copic markers and die cut them out. I used foam tape to adhere them to the cloud panel I had created so complete the sketch. Easy and adorable!

IMG_3227

How cute are those critters?! I just love them. And I think someone will love getting this encouraging card. Be sure to head over to the MFT challenge blog and see all the awesome inspiration! Plus, if you haven’t yet, be sure to check out the new release! It’s so stinkin’ cute and full of springy products. Thanks so much for stopping by today! I’ll see you again soon with another card!

Hello My Friend

Hello, friends!  I’m back today to  share another fun Heffy Doodle card with you all. Today I’m using lots of dies for this cute dino card. Let’s jump right in!

IMG_3196c

I started by die cutting the two tag pieces from the Tag Along dies. The full piece from white card stock and the frame from gray card stock. On the white full die cut I used the Rays the Roof stencil to create the rainbow of rays for the background. I also splattered some gold paint over the piece, as I knew I was going to be using more gold later in the card. I adhered the frame to the piece and tied some black and white twine through the hole at the top.

IMG_3197sc

The next thing I did was die cut one of the larger squares from the Stitched Square Dies set and ink blended some Broken China Distres Oxide ink over the entire piece. I also splattered this piece with gold paint and some of the Broken China ink for some texture and interest. I love to splatter everything!

IMG_3199ff

Next came a lot of die cutting! I die cut all of the different sizes of the Dino Prints dies from white card stock, vellum and gold glitter card stock. Then I arranged the dino prints die cuts all over the square. I heat embossed a sentiment from Whatcha Sayin’ on one of the tiny prints. Once all the footprints were adhered down I adhered the tag down as well with foam tape, and added the final footprints to the tag with the sentiment. Finally, I had one of the dinosaurs from Dino Time already colored and ready to go, so I adhered him to the tag to finsih it off! I love having pre colored and cut images just for that reason 🙂 And my card was finished!! I hope you enjoyed the card I created today. It was heavy on the die cutting, which was fun for a change. Thanks so much for stopping by, and I’ll see you again soon with another card!

May Your Day Be Filled With Smiles

Good morning, crafty friends! Happy Monday. I hope you all had a great weekend, and are ready for a new week. I’ve got a lot planned for the blog with this week, but I’m starting off with a fun card for Penguin Palace! Today I’m wishing it was summer so I decided to create a cute mermaid card.

IMG_2785

I started by ink blending some beautiful blue Catherine Pooler inks onto an A2 card panel concentrating the color at the bottom and letting it fade at the top. I also splattered the darker ink over the panel as well as some white paint. I’ve been loving splattering paint over my blended backgrounds lately! It adds such a fun unique detail. Plus, when I’m trying to make a background look like water it also makes it look like bubbles 🙂

IMG_2825RR

Next I die cut some stitched circles in a few different sizes and ink blended the same blue inks on them leaving some white areas on them. I adhered them to the blended background and then I stamped out my little mermaid from the Take a Break stamp set and colored her in with my Copic markers and used the coordinating dies to cut her out.

IMG_2787

This mermaid is one of my favorites from all the mermaid stamp sets that Penguin Palace carries. She’s so cute! Next I stamped a sentiment from the same Take a Break stamp set and heat embossed it on a piece of light gray cardstock. I trimmed that down and adhered it with some foam tape, as well as the mermaid.

IMG_2785v

I finished the card by adding some white die cut hearts and attaching the panel to a card base! I just love the way all of the extra die cut elements look like bubbles behind this adorable mermaid. I hope you enjoyed the card I created for today! What mermaid of Penguin Palace’s is your favorite? Thanks so much for joining me today 🙂 I’ll see you again soon with another card!

Your Next Stamp Challenge 104

Hi, friends! I’m back today with a card for Your Next Stamp’s final challenge of the year. For this challenge the theme is “anything goes.” I decided to take one of the cards I made towards the end of the year last year and recreate it. Here’s a look at the new card.

IMG_2506

I started the card for today by doing a whole lotta ink blending 🙂 I grabbed a piece of 110 lb card stock that was cut down to A2 size and picked my colors. Last year I used Distress Inks, but for today’s card I changed to Distress Oxide Inks. I love both inks, but the blend on the Distress Oxides is amazing. I started with Chipped Sapphire, and worked through Seedless Preserves, a little Picked Raspberry and Scattered Straw. Once that was all blended I splattered water and white paint over it. (Making sure it was dry between layer). Finally, I used the Scripty Love Die Set hearts to die cut a pattern out of this piece. You may have noticed from yesterday’s card that I used some of these hearts on that project!

IMG_2507

Next, to finish off the background, I die cut one of the small 3×3 Snowflake Panel Die and used the snowflakes from it to adhere around the panel. I made sure to have some go over the card edges and trimmed them so that it looked continuous. I stamped the sentiment ‘warm wishes’ from the Sweet and Fun Holiday in VersaMark ink on black cardstock, and heat embossed white embossing powder over it.

IMG_2508

I stamped out one of the adorable bird houses from Home for the Holidays set and colored it in with Copics and die cut it. It was popped up with foam tape after I attached a string of gold thread to the house and taped it behind the background panel. I just love those little birdies decorating their house 🙂 Here’s a look at both last year’s card and the one for today.
016fIMG_2505And that’s my card for today! Be sure to head over to the Your Next Stamp blog and see the rest of the teams projects as well as to find out how you can play along with us and even win a prize! Thanks so much for stopping by today. I will see you again soon with another card!

12 Days of Christmas

Hi everyone! I’m back today to share my project for the 12 days of gifts series that Your Next Stamp is having. There will be lots of fun projects and a prize! To be entered for the prize be sure to head over to the Your Next Stamp blog and read all the details!

For my project today I made a card with a built in gift card holder. I know a lot of people are giving gift cards at the holidays-it’s such an easy way to say you care-and this just amps it up a little!

IMG_2454YNS

Today’s card is a fun and interactive card. I created it by making a shaker that looked like a snow globe. I cut a half of an oval from this stitched rectangle piece with the Stitched Ovals die. I only did half, and then trimmed the piece away with my scissors. To create the base I die cut three of the stitched rectangles from the Stitched Stripe Panel die from some brown card stock. I layered them and glued them at the base of the half oval. I also wanted a little snow mound for the gingerbread house to sit on, so I grabbed a scrap of white card stock and die cut a partial circle for that. Once my shaker and snow globe portion was put together and attached to the card base I added some more little touches.

IMG_2457YNS

I die cut the Snowflake Panel die from white card stock and added some glitter paste to make them really sparkle. The were attached to the card with a liquid adhesive. I also added some stickles dots, and heat embossed the sentiment from Holiday Mice. Then, I stamped out the gingerbread image to color with my Copics. The outside of my card was complete and it was time to create the gift card holder!

IMG_2458YNS

To create the gift card holder for the inside, I took one of my pre cut pieces of card stock. I have 4 1/4 by 11 pieces of white card stock on hand for card bases. It was also scored in the middle already, at 5 1/2. I folded it, and trimmed off about 4 inches. Then I used my score board to create a crease 1 1/2 inches from the center fold. I used the Stitched Oval again to die cut a partial oval from the folded piece, making sure not to over lap the second fold. It makes a little more sense when you see the picture!

IMG_2460YNS

Then I added some strong adhesive to the parts that would be touching the card base, and my gift card holder was complete! I just love how when the recipient of this card opens this a gift card will be waiting for them, popped up and pretty!

Thanks so much for stopping by the blog today! I hope you enjoyed my gift card creation. This is such a fun way to jazz up a gift card for the holidays. Be sure to stop over at the Your Next Stamp blog and see some more great projects and check back for even more in the coming days! Thanks for stopping by, and I’ll see you again soon with another card!

Your Next Stamp Challenge

Hello, and welcome back! Today I’m sharing a card that I made for Your Next Stamp’s newest challenge. This week’s challenge was to make a card based on a Christmas Carol. I was inspired by Silent Night and Rudolph the Red Nosed Reindeer. Here’s what I came up with.

IMG_2462I started today’s card by die cutting the Snowfall Panel die from some light blue cardstock. Then I ink blended Faded Jeans and Blueprint Sketch around the edges to give it some depth. I also flicked on some white paint for an even snowier look. There’s something about when it’s snowing that is so soft and quiet. That’s where my Silent Night inspiration came in. I also die cut the Wave Panel die and trimmed out most of the pieces, except the bottom two to create a snow bank. I liked the way this created a border around the card and gave a fun and interesting snowy hill for my reindeer to play on.

IMG_2465

I took the star trio from the Photo Booth Panel die and die cut them from some plain white card stock. I wanted them to pop in the sky so I heat embossed gold embossing powder over them. To make them nice and thick and glossy I did two layers of the embossing powder. I also heat embossed my sentiment from the Holiday Reindeer stamp set on black paper and trimmed it down to be a cute little banner.

IMG_2463

Finally, I stamped the reindeer from the Holiday Reindeers stamp set and colored him in with my Copic markers. I obviously had to make his nose red, since I wanted to go with the Christmas carol theme 🙂 I added some Glossy Accents to his nose and eyes and some white gel pen accents as well. I popped him on the card with a action wobbler so that the recipient can make him wiggle and spin.  And that completed my card!

IMG_2461Be sure to head over to the Your Next Stamp blog to see the rest of the team’s cards and get the details on how to play along with us! This is such a fun and festive challenge that will get you in the holiday spirit 🙂 Because we all know, the best way to spread Christmas cheer is singing loud for all to here! Thanks so much for stopping by today! I’ll see you again soon with another card.

Hootiful!

Hi, everyone! I’m back today to share a cute new card I made using products from the new release. I have a good problem solving tip for you for cover plate dies too! Let’s jump in.

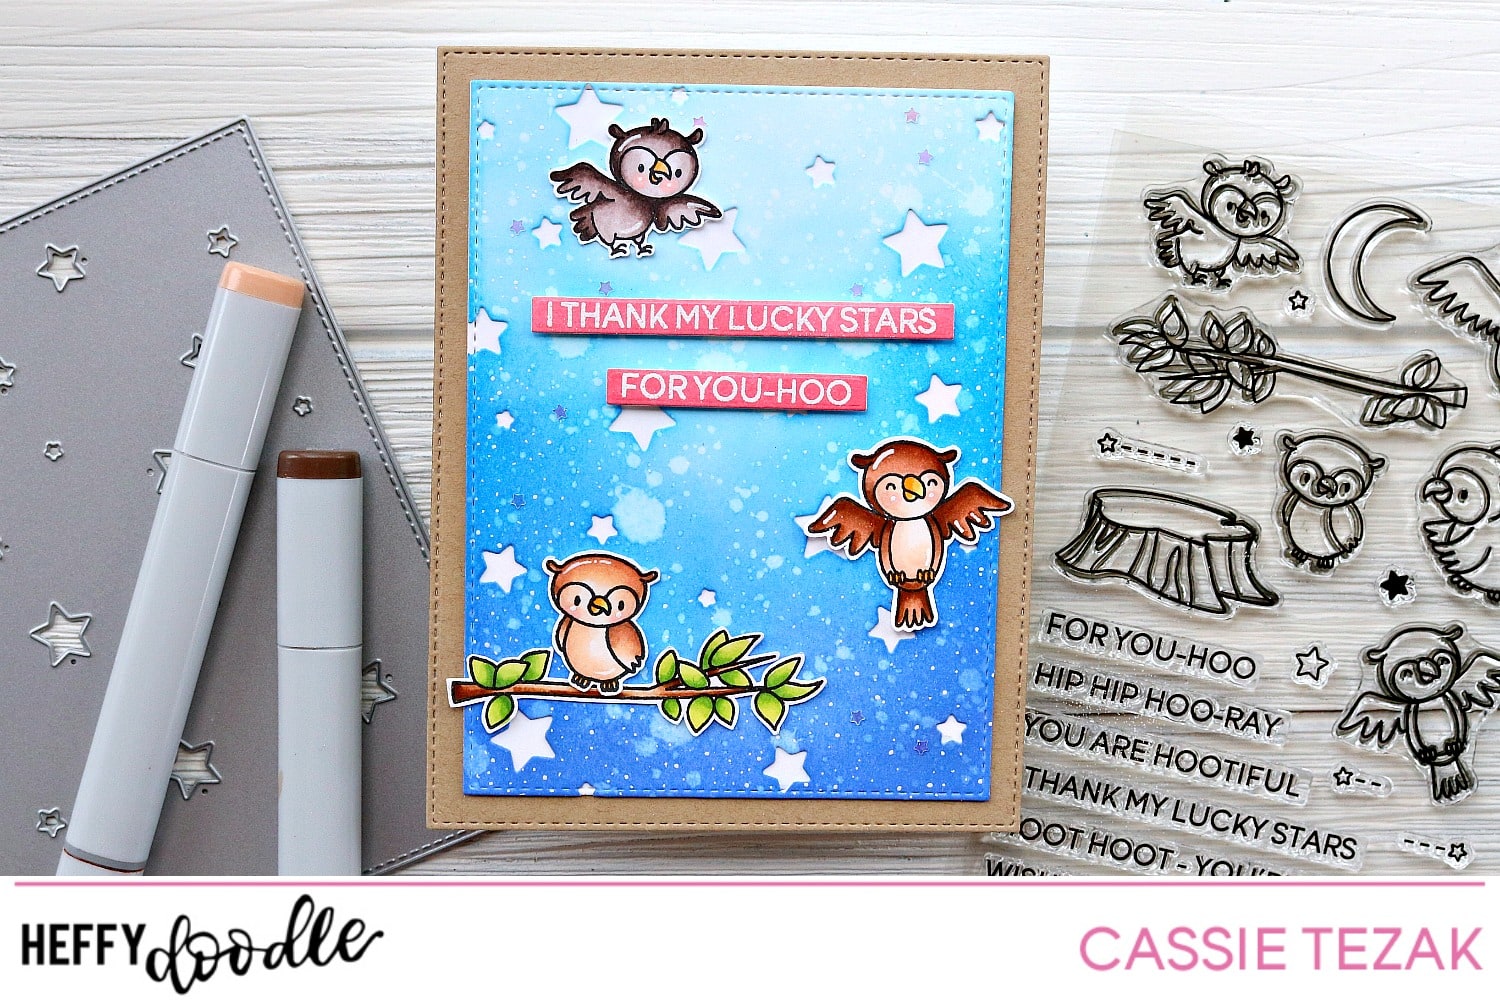
I started off the card for today by stamping out these three owls from Hootiful as well as the branch. I colored them in with my Copic markers and fussy cut them out. However, there are coordinating dies for these! Once I had those all ready I started working on the background.

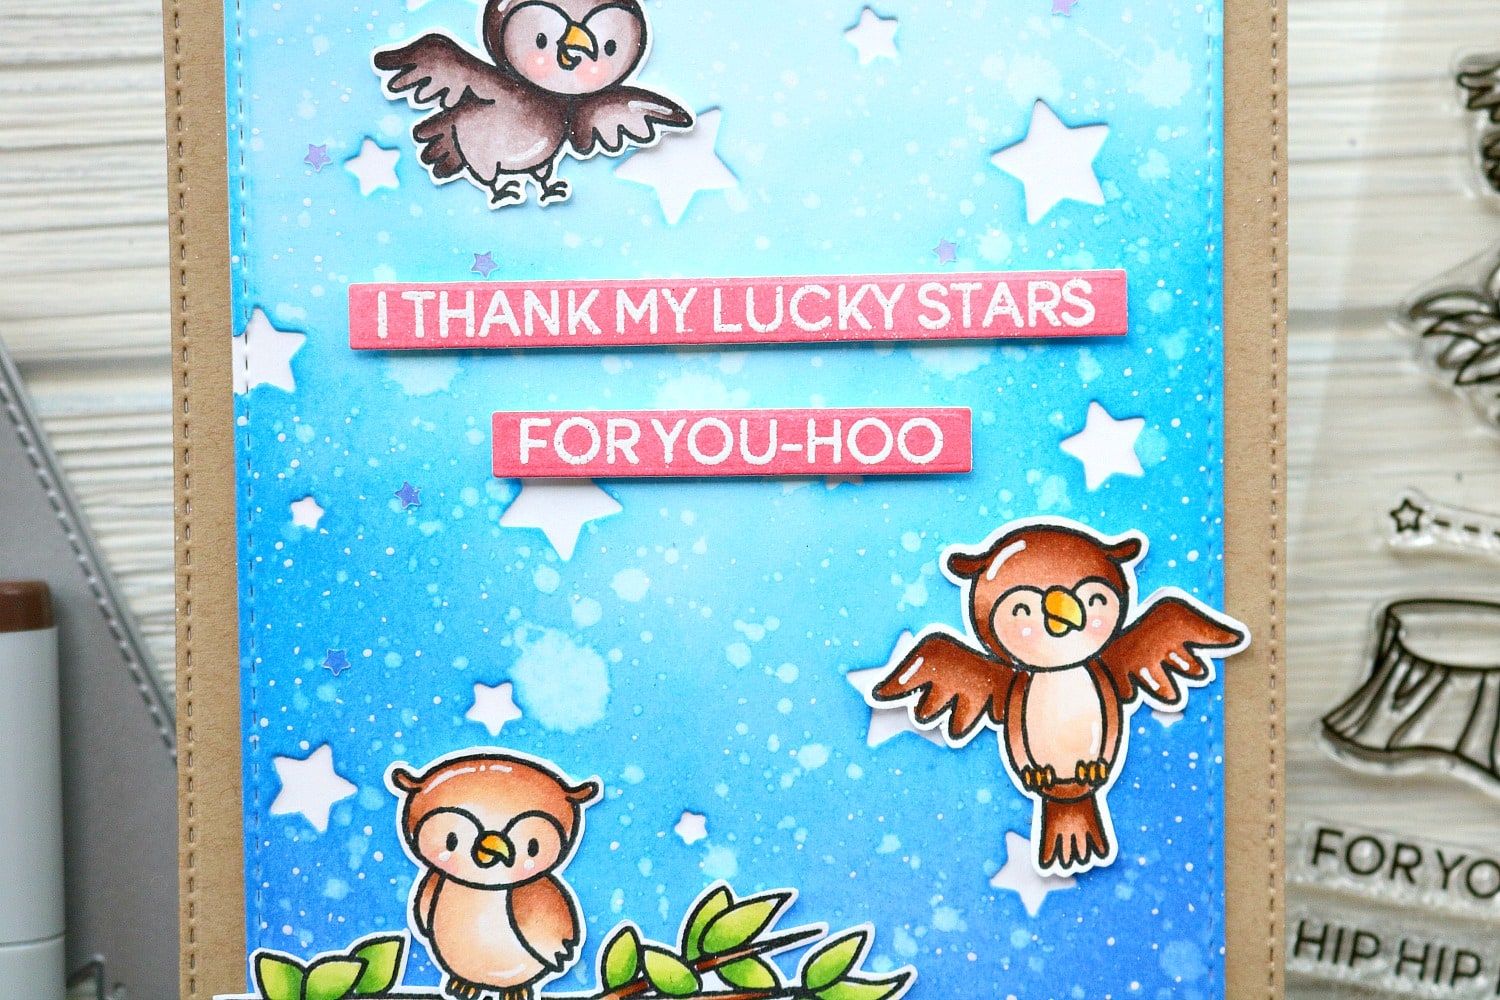
I had planned on making the Stargazer Backdrop die, however I hadn’t properly secured the die to my paper when running it through the machine and it shifted. I really didn’t want to waste the piece of paper, so instead of tossing it I decided to die cut one of the stitched rectangles from the Imperial Stitched Rectangle dies from it. It was then that I realized how much versatility this provided for future projects! And it completely fixed my mistake. I ink blended Blueprint Sketch and Salty Ocean over the star rectangle and splattered it with water to get the bleached splotches you see.

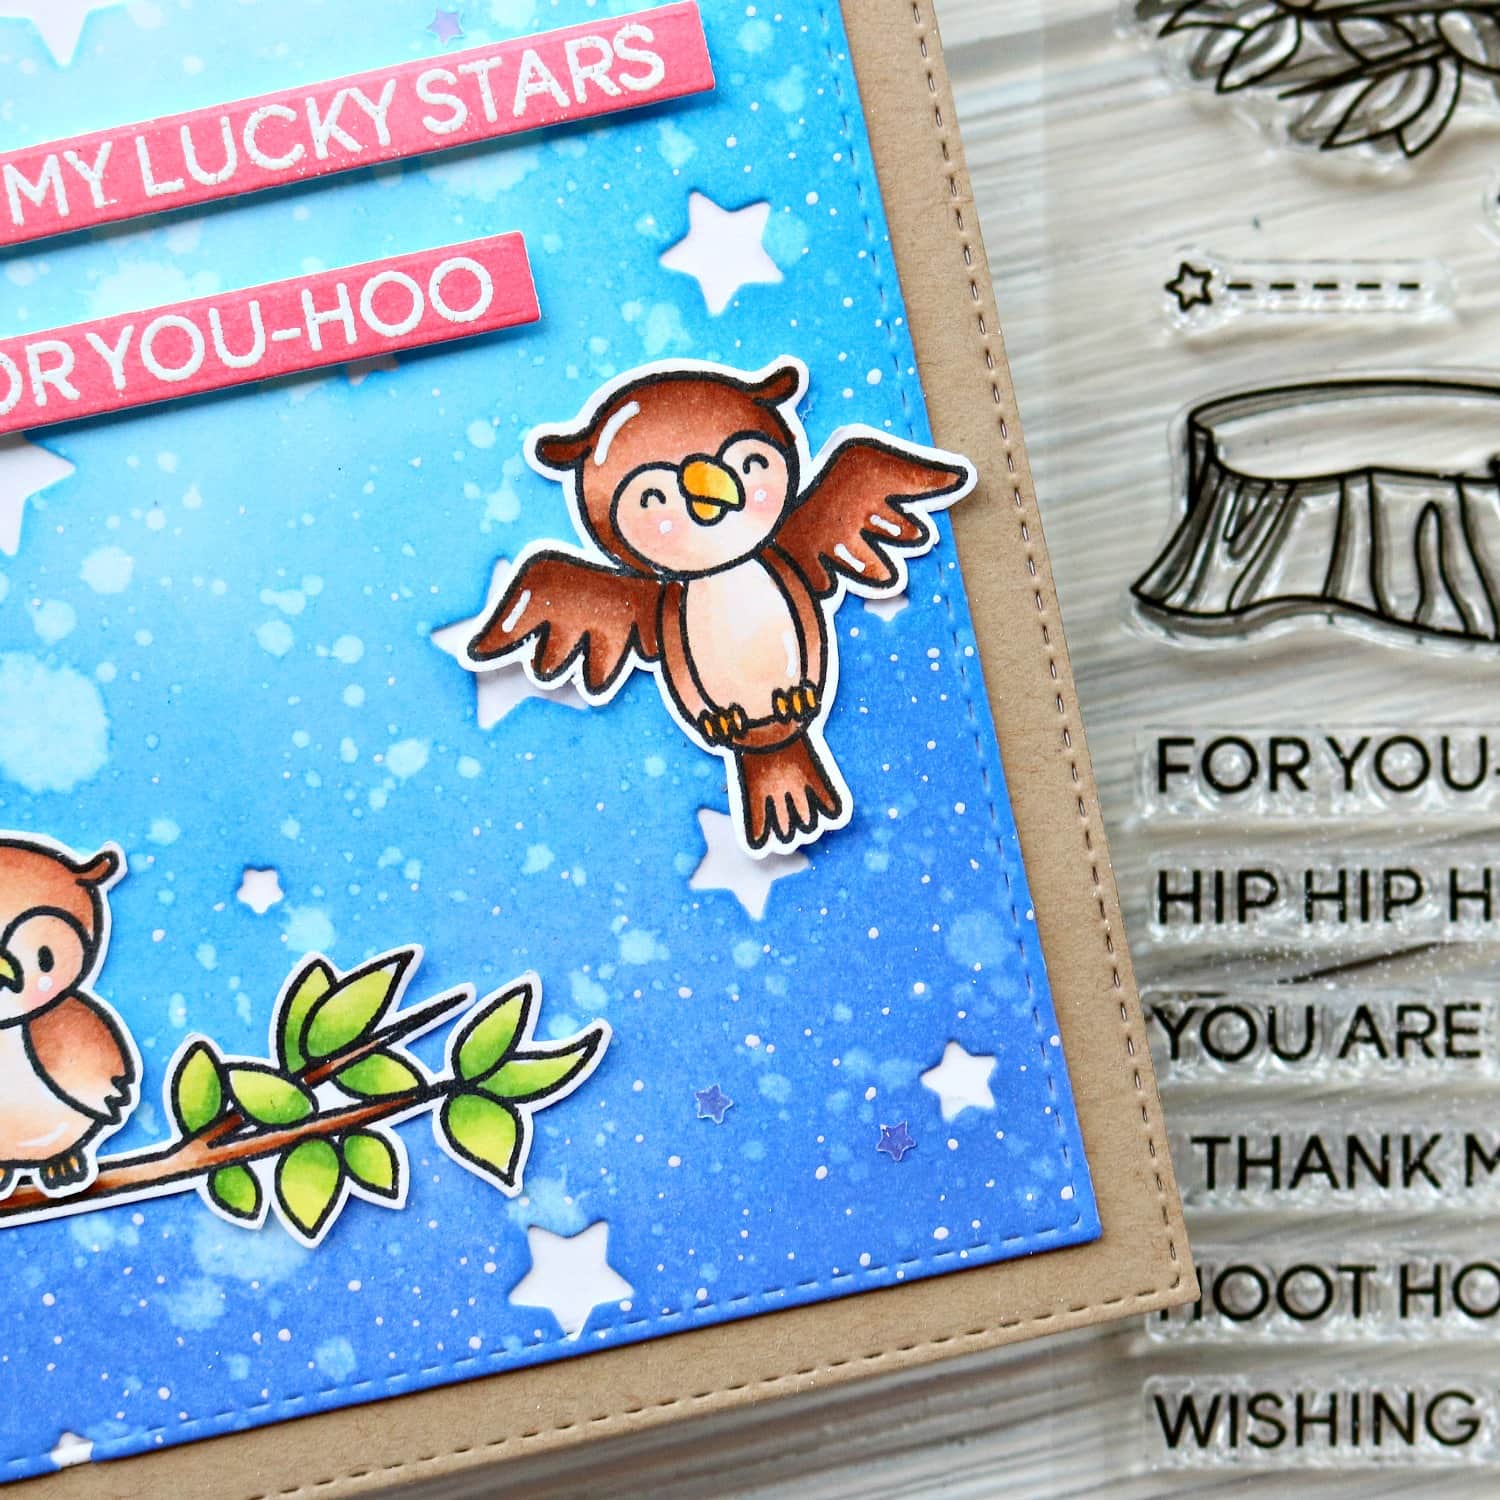
I die cut another rectangle at the same size from white paper to put behind the star piece, as well as a A2 size rectangle from some kraft card stock for the base. I adhered all these together using some tape runner. I also adhered all the owls with some tape runner to the star panel.

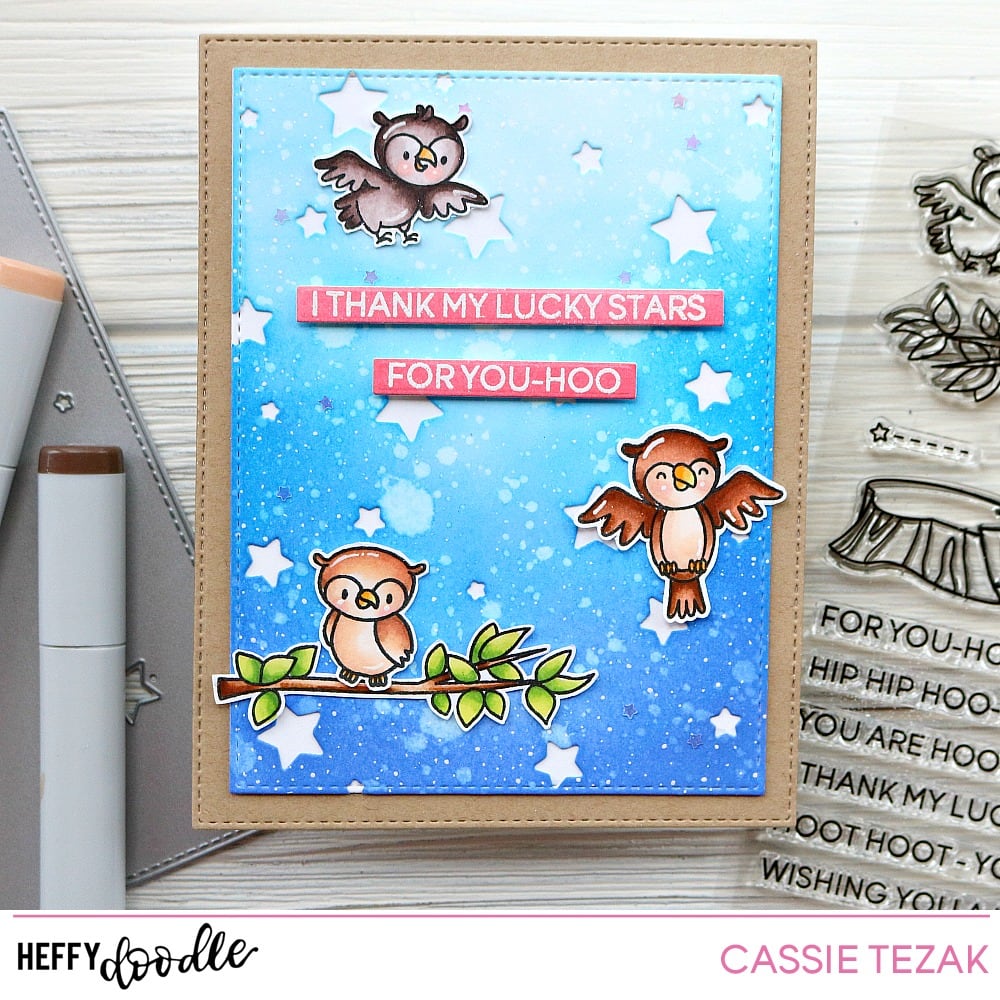
For my sentiment I heat embossed a saying from the stamp set and die cut it with the smallest Strips of Ease die. After it was die cut out I carefully ink blended some Worn Lipstick Distress Oxide ink over it for a pop of color. My final touches were adding white gel pen accents and some iridescent stars to the background. I hope you enjoyed the card today! I’ve seen a couple people are receiving their new release orders and I’m curious what you want to play with first!? These owls were at the top of my list when I saw the new release 🙂 Thank you so much for stopping by today! I hope you all are having a great day, and I’ll see you again soon with another card!


Heffy Doodle Blog Hop!

Hi everyone! Welcome to my stop of the Heffy Doodle blog hop! I hope you’ve seen lots of fun projects so far today. And there are plenty more still to come! If you’ve started here, head back to the Heffy Doodle blog and start from the beginning. Leave comments on the blog hop posts to enter yourself for a chance to win a £50 gift certificate to the Heffy Doodle shop. Here’s a list of the stops today in case you need to make sure you haven’t missed anyone!

Line Up:

Heffy Doodle
Kori
Kelly
Ali
Heather
Sindhu
Cassie –You Are HERE!
Tallie
Franci
Dennice
Jessica M
Isha

Alright! Let’s get to my card for today 🙂 I’m using some new products today alongside some old products to create a really cute scene and awesome shaker card. Here’s a look at the project.

IMG_2256

Yup! That’s a volcano shaker card! My sister gave me the idea for this, and I’m happy to say it turned out just like we imagined. To start I stamped out some of the dinosaurs from the Dino Time stamp set along with the volcano from Geology Rocks. Everything was colored in with my Copic markers and die cut with the coordinating dies. I knew my colors were going to pinks and reds, so I tried to keep the dinos pretty neutral with only a hint of pink for some color.

IMG_2258

Once that was done I started to make the scene for these cuties to be in. I started by taking an A2 size piece of white cardstock and die cutting the third largest rectangle from the Imperial Stitched Rectangle dies from it. Next, I took a heart die from my stash and die cut a V shape from the top of the inner rectangle I die cut. This was going to be for my shaker. On the outer frame I ink blended some Candied Apple Distress Oxide ink and spritzed it with water for the speckled look. Then I used the First Snow Stencil to create some hills on the inner rectangle with some Walnut Stain Distress Oxide ink.

IMG_2259

Once all that was done I started assembling my shaker. I was a little difficult to get the sequins right where I needed them, since my shaker window was so small and oddly shaped, but even with the fussing I had to do with it I still think it was worth it in the end. I used two layers of foam tape to add dimension and give enough space for the sequins I used to have room to move around. When that was all put together I could add my dinosaurs and volcano.

IMG_221To finish off the card I heat embossed my sentiment on some black card stock with white embossing powder. I used the Strips of Ease die to cut out the sentiment and cut a banner in one end. I also added some white gel pen accents to the images, and then my card was complete!

I hope you enjoyed the card for today, and are having fun on the hop! Don’t forget to leave a comment for a chance to win a gift card to the HD shop! Winners will be announced on the Heffy Doodle blog on October 24th.  And if you’re doing some shopping be sure to remember the promo going on right now to get the cute freebie Dinky Dinos.  Spend £30 to get dinky dino stamps, spend £45 to get stamps and dies.

Thanks so much for stopping by and I’ll see you again soon with another card!

Your Next Stamp Challenge #94

Hi, everyone, and welcome back! I’m so happy it’s Friday, and to celebrate I’ve got a card that I made for the Your Next Stamp Challenge #94. Today’s challenges were both fun, but I decided to go along with the color challenge. The colors were so warm and summery that I got inspired instantly 🙂

Aren’t these colors lovely? 🙂

IMG_1926

I started my card by ink blending Spiced Marmalade, Fossilized Amber and Antique Linen Distress Oxide inks over an A2 size card panel. Then I took another A2 size panel of white paper and die cut the Dot-tastic Circle die twice from it. I wanted the different colors to be seen so I made sure to die cut them at different heights.

IMG_1928

Next I ink blended the same colors over another piece of paper. I die cut the Honey Drip die from it to look just like dripping honey over the top of my card. When it was dry I heat embossed the sentiment from the Honey Bee stamp set. I also stamped out a handful of the images from the Honey Bee stamp set and colored them in with my Copic markers.

IMG_1929

I attached the ink blended background to the die cut piece. The honey drip was popped up with foam tape. So were the bees. The flowers were glued straight down to the card, and the whole thing was adhered to a card base!

I hope you enjoyed the card for today! Be sure to head over to the Your Next Stamp blog for more inspiration and awesome projects! Thanks for stopping by!

Your Next Stamp Dare!

Hi, all! Welcome back to Creatively Cass. I’m back today with a card that I made for the July Design Team Dare for Your Next Stamp. Today’s theme was ‘pop it up.’ This could’ve been taken a lot of different ways, but I chose to use some foam tape to add dimension to my card for this challenge. Let’s take a look!

IMG_1867

I started by die cutting the Mini Drink Die set from a piece of A2 110 lb card stock. I made sure to keep it within the edges of the piece of paper, as well as making sure I didn’t overlap anything. This made it easier to pop up the piece with foam tape later. I ink blended Blueprint Sketch, Peacock Feathers, Antique Linen and Fossilized Amber over the die cut panel and spritzed it with water.

IMG_1866

Once that was completely dry I popped it up with the foam tap, directly onto a card base. I used my Misti stamping tool to stamp the face from the Happy Hour stamp set on one of the glasses, and colored in the cheeks with a light pink Copic marker. I used one of the umbrellas I die cut to color in and adhere to the glass with the face.

1

I die cut one of the speech bubbles from Talk Bubbles and Arrows die set and heat embossed the sentiment from Happy Hour on it. That also got popped up with foam tape. And with that my card was complete! I hope you enjoyed the card I created for today. Be sure to head over to the Your Next Stamp blog and leave a comment for a chance to win a stamp set of your choice!

Thanks so much for stopping by today. I’ll see you again soon with another card!